An effective content strategy is guided by keyword research.
That’s why digital marketers use Google Ads’ Keyword Planner.
With its treasure trove of keyword data, Keyword Planner can help launch your content strategy into success.
Be warned, though: While it was possible to access this tool without an account in the past, Google now requires that you set up an ad campaign and provide payment information before you can access Keyword Planner. It's still free in that you don’t need to actually pay Google Ads and run an ad campaign—but you'll have to enter credit card info and create a campaign before you can use the tool.
But if you’d rather not jump through these hoops, it’s best to stick to keyword tools like Google Trends, which do not require an account whatsoever.
Of course, the insight provided by Google’s Keyword Planner can’t be overstated—after all, it provides raw data from Google itself, the one and only search engine behemoth. So you’d be well advised to create an account, even if it’s simply for the sake of accessing Google’s Keyword Planner.
How to Access the Keyword Planner
First things first: how do you access the tool?
You can directly click into the Keyword Planner through the tool’s landing page on Google Ads (formerly Google Adwords). After prompting you to log in, this link will take you straight to the planner.
Or, you can log into Google Ads and get to the planner from the main campaign page.
Just click the wrench icon in the navigation bar at the top of the page after logging in. This will open up a larger menu, which includes Keyword Planner as the first option in the leftmost column.

After reaching the Keyword Planner, you’ll find two options:
- Find new keywords - Use this feature to identify keywords and phrases related to those you enter, along with their search volume. Since this tool is intended for carving out a Google Ads campaign, you’ll also see estimated bids for each word—the projected amount you’d spend every time a user clicks on an ad.
- Get search volume and forecasts - This option is ideal if you’ve already got a list of keywords and phrases that you want to target. Keyword Planner will provide comprehensive data about each word’s search volume, projected performance, and the cost of an ad campaign built on these words.

These two functions are Keyword Planner’s bread and butter, and you can dive into each more deeply to conduct keyword research.
<div class="tip">Looking for other cost-effective optimization tools? Try these free SEO tools to take your content strategy to the next level.</div>
Find new keywords to target.
To get started, enter your current target keywords.
For instance, perhaps you’re an aspiring artisan baker managing a website about bread. With so many different types of bread to write about, how do you determine which has the greatest search value?
After you enter your current keyword list, Keyword Planner will take you to a results page that includes your original words and more.
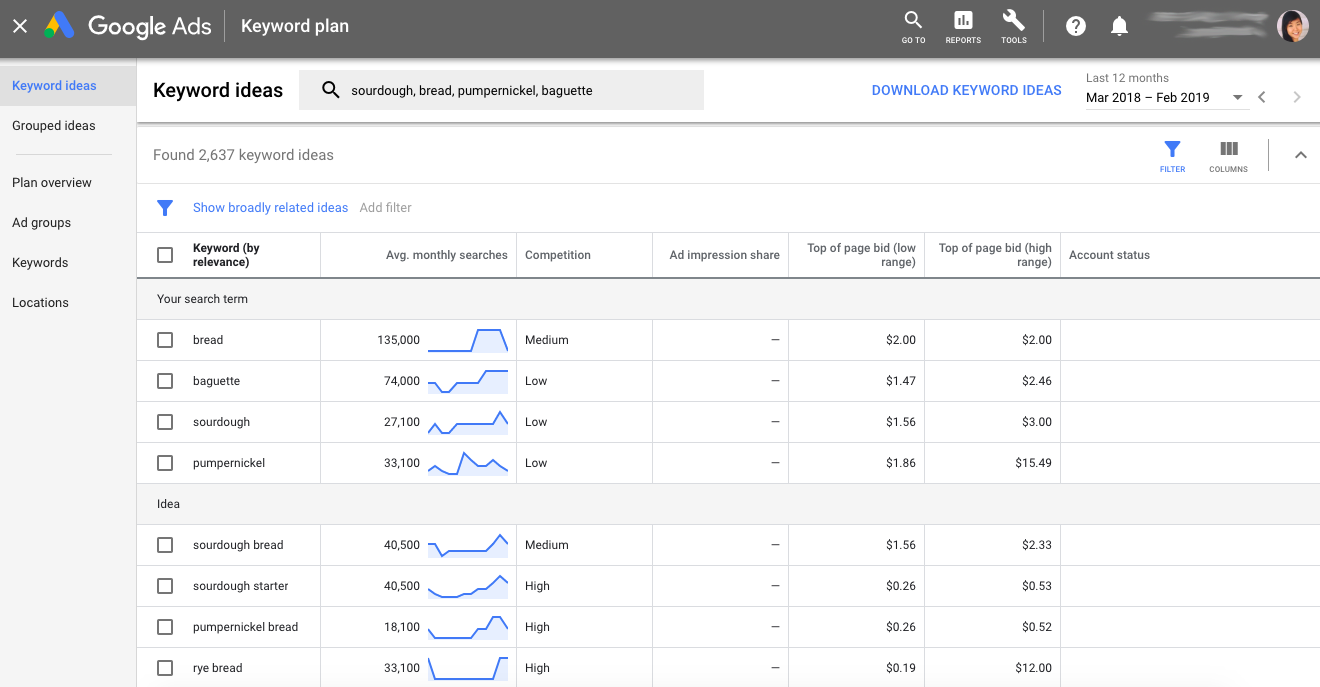
While it looks like many suggested ideas are simply combinations of the keywords you initially entered, keep scrolling.
You’ll see completely new related terms and their respective average search volume. There’s even a column titled “Competition” that shows how competitive each keyword is, from low to high.
This insight is immensely helpful for identifying high-search volume, low-competition keywords—the sweet spot for building out a content strategy with solid ROI. What makes this the so-called sweet spot?
Consider:
- If you target a low-search volume, high-competition keyword → traffic will be next to nonexistent.
- If you target a low-search volume, low-competition keyword → you’ll get a handful of visitors at best.
- If you target a high-search volume, high-competition keyword → you’ll need to work much harder (and expand your content marketing budget) to make your content outperform its competitors.
In addition, if you wanted to create a PPC campaign, this keyword data includes a range of bid prices. You can similarly use this info to determine which keywords have the best ROI based on their search volume and level of competition, but also factoring in the bid amount Google suggests. Beware, though—these bid prices are only estimates and actual bids will depend on a number of contextual factors, including CTR, the quality of your ads, and Quality Score.
Get search volume and forecasts.
What if you already have a list of target keyword phrases in mind? It’s a relatable scenario: you know what you want to write about, but just aren’t sure which keywords to prioritize.
If this applies to you, select Keyword Planner’s “Get search volume and forecasts” option instead of “Find new keywords.”
Input your keywords. You can do this manually or by uploading a spreadsheet using Google Ads’ template format.
The results that immediately appear fall under the “Forecasts” tab and describe PPC metrics. They aren’t so relevant if you’re focused on SEO.
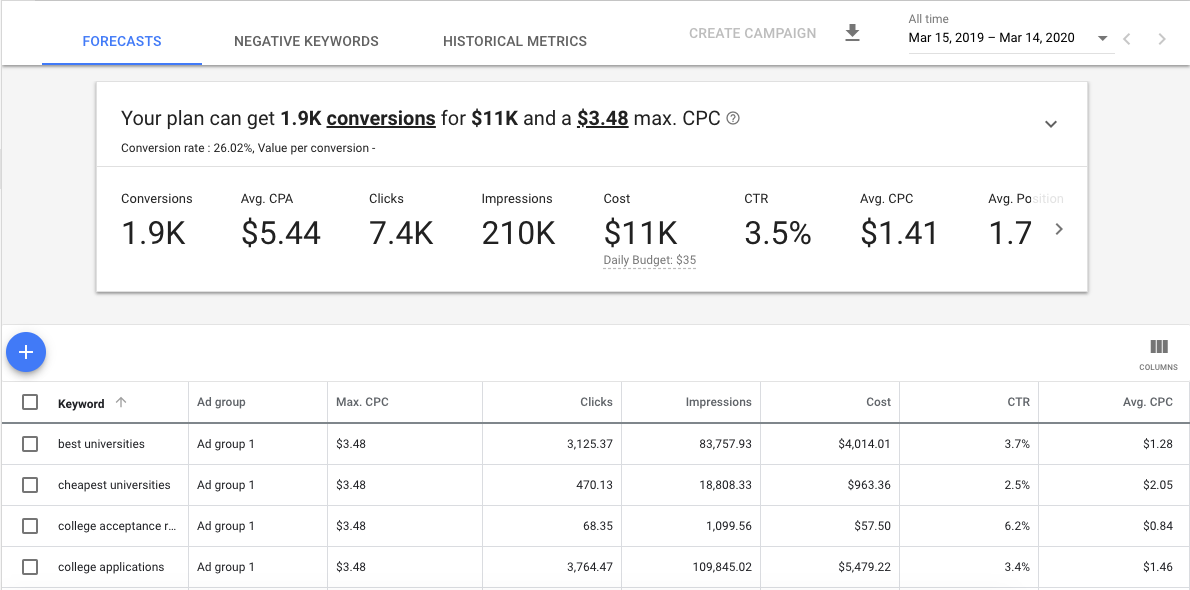
However, if you click “Historical Metrics” in the navigation bar, you’ll find the search volume data for the keywords you entered.
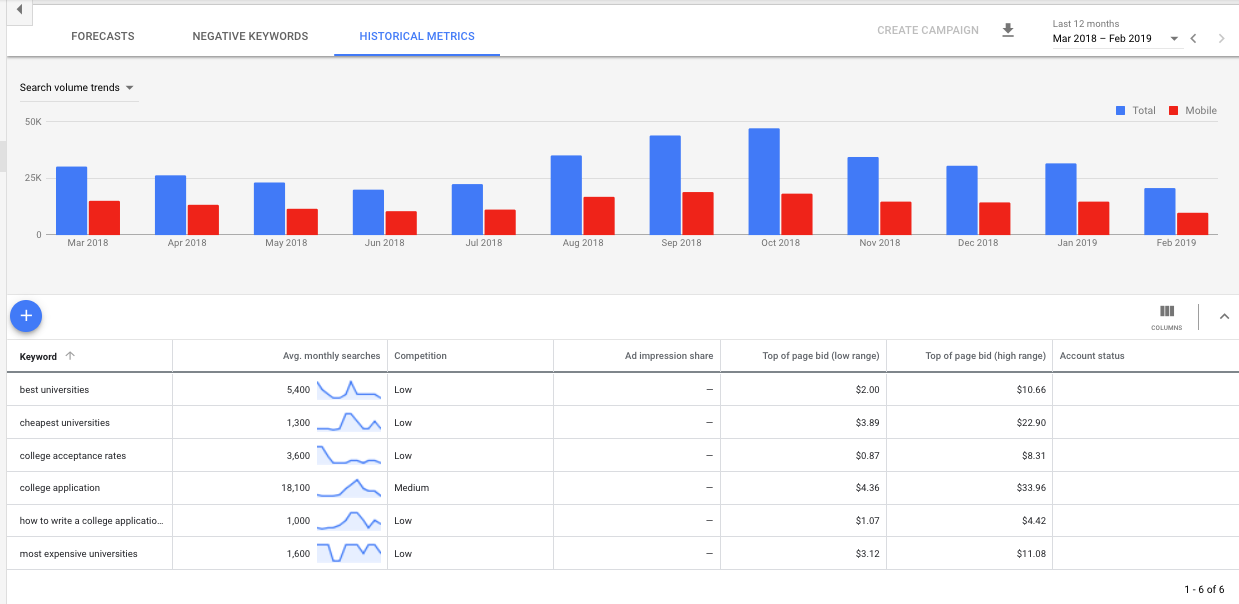
Look familiar? This keyword data is actually almost identical to the data that would have appeared had you chosen the “Find new keywords” option. The only difference is that no additional keywords are suggested when you select the “Get search volume and forecasts” function.
What do the forecast metrics mean?
Keyword Planner’s forecast data can be overwhelming at first glance. While many of these numbers refer specifically to ad campaigns, they’re still worth keeping in your back pocket should you decide to invest in PPC.
Here’s what each term in the summary table means:
- Conversions - Conversions occur when your desired action for a user is completed. While conversions are typically thought of as purchases, they encompass much more, including filling out a form and signing up for an account.
- CPA - Cost per acquisition, also known as cost per action, essentially describes how much you’re paying for each conversion.
- Clicks - A click is counted every time a user clicks on your ad.
- Impressions - An impression occurs every time your ad appears on a search result page (SERP).
- Cost - This figure is an estimate of how much an ad campaign based on your target words would cost, with an additional Daily Budget number for each day of your campaign. The longer you set your time frame, the more expensive your campaign will be.
- CTR - Short for “click-through rate,” this term is the percentage of users who click on a specific link out of the total number of users who have seen it (the total number of impressions).
- CPC - This metric stands for “cost per click” and refers to how much you pay each time a web visitor clicks on your ad. CPC will generally be lower than CPA because not everyone who clicks will convert.
- Average Position - SERPs have multiple ads, the placement of which vary based on a formula Google uses to rank ads. Average position thus describes where your ad tends to be placed compared to others, and if you want it to appear higher, you need to bid more.
As you can see, these metrics largely refer to the hypothetical results of an ad campaign based on the keywords you’ve entered. But even if you don’t create an ad campaign, they’re helpful for assessing the value of a set of keywords in the time frame you designate.
Filter out unwanted content.
Google receives well over 3.5 billion searches on a daily basis, many of which aren’t relevant to the topics you want keyword data for.
Luckily, Keyword Planner has a filter option that you can use to refine your data. This bar is visible when you use the “Find new keywords” function, and is located just above the results table.

Here are some examples of filters you can apply:
- Relevance - Choose between “broadly” and “closely” related keyword ideas to show either more tangentially or directly related phrases.
- Exclude adult ideas - Ensure your keyword data is kid-friendly by toggling this filter.
- Competition - Want to focus on keywords of a certain competition level? You can select low, medium, or high (or a combination of these) using this.
- Average Monthly Searches - Filter data so that keywords above or below a set search volume threshold appear. This is helpful for identifying words to build out a long-tail keyword strategy or for going all in on high-volume words and phrases.
Identify seasonal trends.
Users search for different words and phrases over the course of a year.
This is because some subjects are topical—take for example, any major current events like government elections and March Madness.
It’s not just current events, though. You can see search fluctuations for more general terms like “prom dress” and “graduation gift” because they’re similarly more relevant during a specific time of the year.
With Keyword Planner, you can determine which phrases have transient search volume and how much they change over time.
There are two ways of doing so:
- Choose the “Find new keywords” tool, and a graph of search volume data will be immediately visible once you enter your keywords.
- Choose the “Get search volume and forecasts” option, and find the search volume timeline graph under the “Historical Metrics” tab.
Remember that you can adjust the time frame of your search for more or less specificity. For example, you can hone in on just one month, the past year, the past two years, or even all time.

Why does being aware of these seasonal trends matter for your content?
You can use this knowledge to better structure your content creation calendar.
For instance, if you own a clothing store, you can start advertising winter gear in as early as September based on the sample search above. And knowing that February still sees decent search volume, you might want to reserve your end-of-season sales for March.
Find out where your target audience is based.
Aside from finding out how keywords vary in search volume over time, you can also find out where exactly users searching for your target keywords are located.
These users matter because they make up your target audience—and their location may clue you in on how to better appeal to them.
To find out where they are, click Plan Overview in the left-hand column. This will lead you to a big picture view of your keyword plan, which includes a pie graph titled “Locations” towards the bottom. This chart provides a convenient visual breakdown of where your audience is concentrated; you can even delineate where exactly by using the dropdown menu in the table.

In the example plan above, Keyword Planner used the United States as its default location. However, the Locations chart reveals that 20% of searches are made from Florida. This helpful insight suggests that Florida has the greatest share of searches, but what if your business is based elsewhere—in Texas, for instance? You want to find out where exactly those Texan users are, so that means the other state data is irrelevant.
Scroll back to the top of the Plan Overview page, and select “Locations”. Click the X to remove the United States (or whatever broader area that’s set) as the target location, and enter in the new area you’d like to see data for—in this case, Texas.
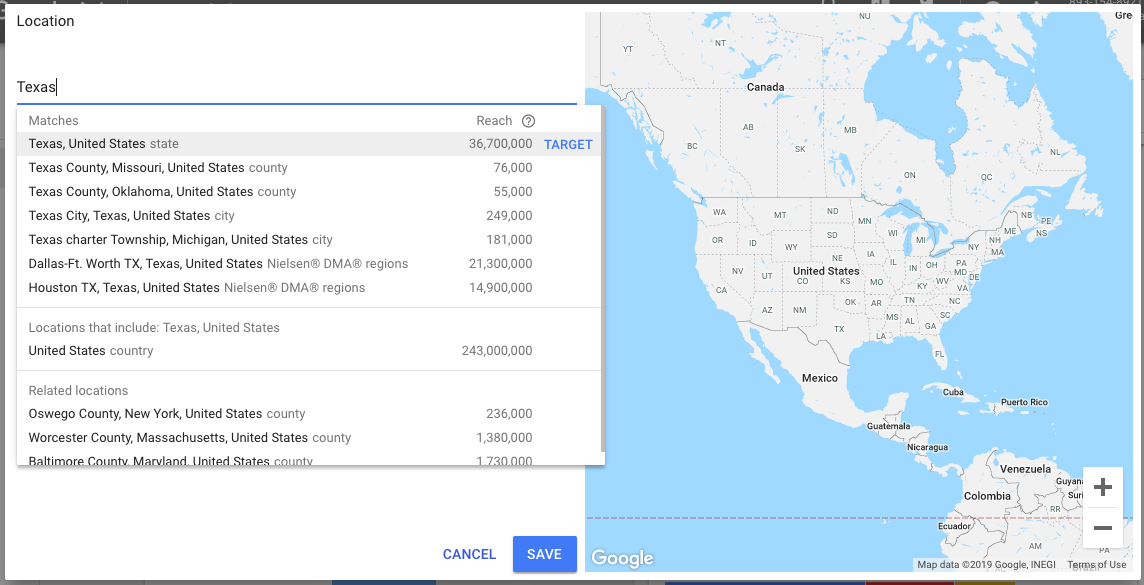
Search suggestions will appear as you type. When you find the one you’re looking for, click “Target” and then save.
All of the keyword plan’s data will update accordingly to reflect the new place you’ve designated. That includes the location chart.
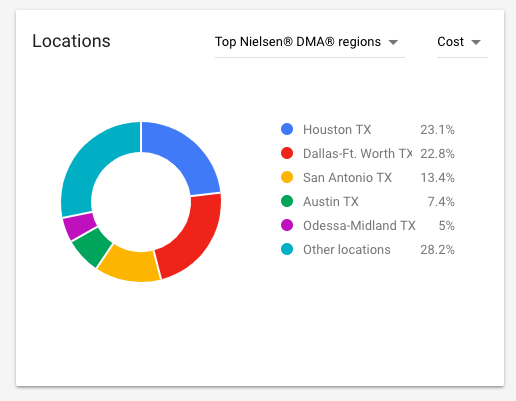
In our example, we moved from country to state-level keyword data, but Keyword Planner can get more detailed—down to the county, metropolitan area, and city.
And with this data, you’ll be better prepared to geotarget your content—that is, create targeted content based on where your users are located.
Pick up where you leave off.
If you accidentally exit out of your keyword research session, there’s no need to worry.
Google Ads will conveniently save your research as a plan that you can easily pick back up the next time you access the Keyword Planner.

Once you click “Resume Plan,” you’ll be guided to your Plan Overview, the helpful summary of the keywords you’ve entered, their forecast, usage across different devices, and where the most searches made for these terms are.
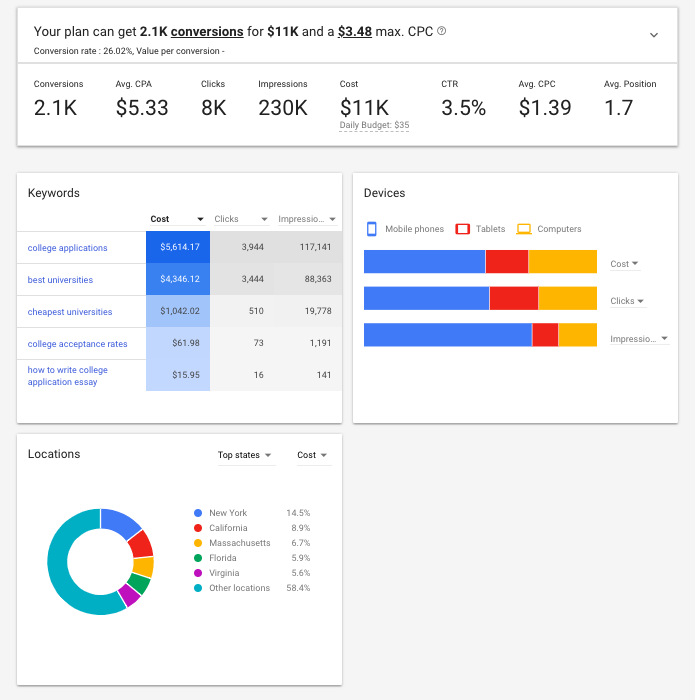
There’s no need to start from scratch with this helpful autosave.
And if you want to continue adding keywords to your plan, just click on “Keywords” in the menu on the left. The existing list you’ve already made will be saved by default as “Ad group 1”—select that as your ad group and enter in your additional keywords.

Conclusion
Google’s Keyword Planner changes fairly frequently, which has led to a variety of resources and guides with outdated screenshots. But for the most part, its functions remain the same, even if its interface doesn’t.
Although you have to jump through more hoops to access it, Keyword Planner still makes a powerful addition to any SEO’s arsenal of keyword research tools. With search data from Google itself, it provides valuable insight for creating a highly targeted and well-informed content strategy.

.svg)
.svg)


